Audit Report
Build the report for an audit engagement, preview exactly what the client will receive, and export it as a Word document or PDF.
What the page is for
The Audit Report page turns an audit engagement into a finished report. The left column holds the report settings, which never print. The right column is a live preview, and it is exactly the same content the PDF and Word document are made from, so what you see on screen is what the client receives.
You choose who the report is written for, the page size, an optional watermark and whether to include the evidence index. You can switch standard sections on or off, reorder them, and add your own sections of text after any standard section.
Every report you export is listed under Reports generated with its format, sections, number of findings and a SHA-256 fingerprint, so you can prove later which copy was issued. You mark each export as a draft (watermarked as one) or as the final, issued copy.
What you see
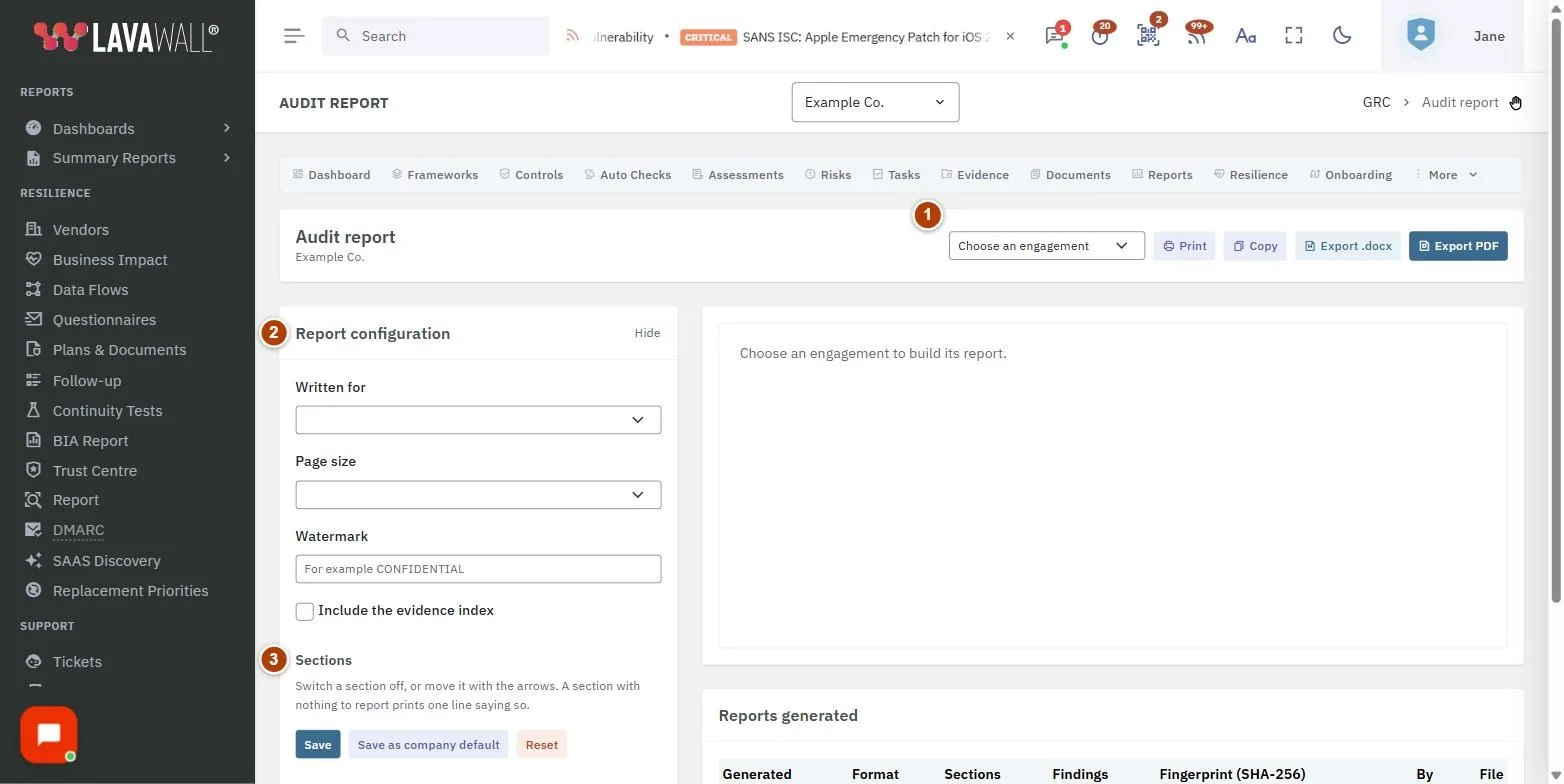
- Top bar: the report title and company, an Engagement picker, and Print, Copy, Export .docx and Export PDF.
- Report configuration: Written for, Page size, Watermark and Include the evidence index, with Hide to collapse the column.
- Sections: switch standard sections off or move them with the arrows, then Save, Save as company default or Reset.
- Custom sections: your own text sections, with Add a section.
- Preview: the live report.
- Reports generated: Generated, Format, Sections, Findings, Fingerprint (SHA-256), By and File, with a Draft or Final badge.
How to build and export a report
- Choose the engagement in the Engagement picker.
- In Report configuration, set Written for, Page size and an optional Watermark (for example CONFIDENTIAL), and tick Include the evidence index if needed.
- Under Sections, switch off sections you don't need and use the arrows to change the order. Select Save.
- Check the preview on the right.
- Select Export .docx or Export PDF, then choose Draft or Final.
- Download the file from Reports generated.
How to add your own section
- Under Custom sections, select Add a section.
- Optionally pick a starting point in Start from. It fills a heading and a paragraph to edit, and replaces what is already in the box.
- Enter the Heading, choose Place it after, and write the Text.
- Leave Include this section in the report ticked and select Save.
- To remove a section, open it and select Delete.
How to reuse a layout for future engagements
- Set up the sections and settings the way you want them.
- Select Save as company default and confirm. New engagements start from this layout; the current engagement keeps its own.
- To go back, select Reset. The layout returns to the company default (or the built-in one); custom sections are kept.
How to get an AI first draft of a section
- Open a custom section.
- Select AI first draft. A window shows exactly what will be sent: summary figures only, with no evidence, file names, fingerprints, finding detail beyond titles, names or email addresses.
- Select Send. The draft appears in the text box, flagged for review. Nothing is saved until you select Save.
- Or select Copy the report data as a prompt to use the same figures in your own tool.
Tips
- A section with nothing to report prints one line saying so, rather than disappearing.
- Use Final only for the copy you issue; drafts are watermarked so they can't be mistaken for it.
- Copy puts the report text on your clipboard for pasting elsewhere.
- Times in the report are printed in UTC so the record doesn't depend on who opens it. The Reports generated list shows times in your own time zone.
Troubleshooting
- "Choose an engagement to build its report." Pick an engagement at the top. Engagements are created on the Audits page.
- "Nothing generated yet." No report has been exported for this engagement. Select Export .docx or Export PDF.
- The export buttons are missing. Exporting needs a GRC role that can export.
- I can't change sections or mark a report final. These need audit permission in your GRC role.
- AI first draft is missing. AI drafting is off for your company. A GRC administrator can turn it on in Compliance Settings.
Task guides that use this page
Related articles
Still need help?
Search the support centre, or contact our support team and tell us which page you were on.
Names, companies, devices and figures in the pictures are examples. Other product and company names are trademarks of their respective owners.