Calendar
See your meetings, calls, follow-ups and scheduled tickets in one calendar, and keep it in step with your Microsoft 365 or Google mailbox.
What the page is for
The Calendar is the scheduling side of the CRM. It shows the meetings, calls, tasks and other activities you log against clients, the follow-ups you have promised, and tickets that are scheduled for a particular time. You can also record licence and domain expiry dates so renewals are never missed.
You can add events by clicking a day or dragging an event type onto the calendar, and move them by dragging. Each event can be linked to a client company, a contact and other attendees, assigned to a team member, and set to repeat.
With Calendar Sync, you can link the calendar to a Microsoft 365 or Google Workspace mailbox. Sync is two-way: events in the mailbox appear here, and events created here appear on the linked calendar within about 30 seconds.
What you see
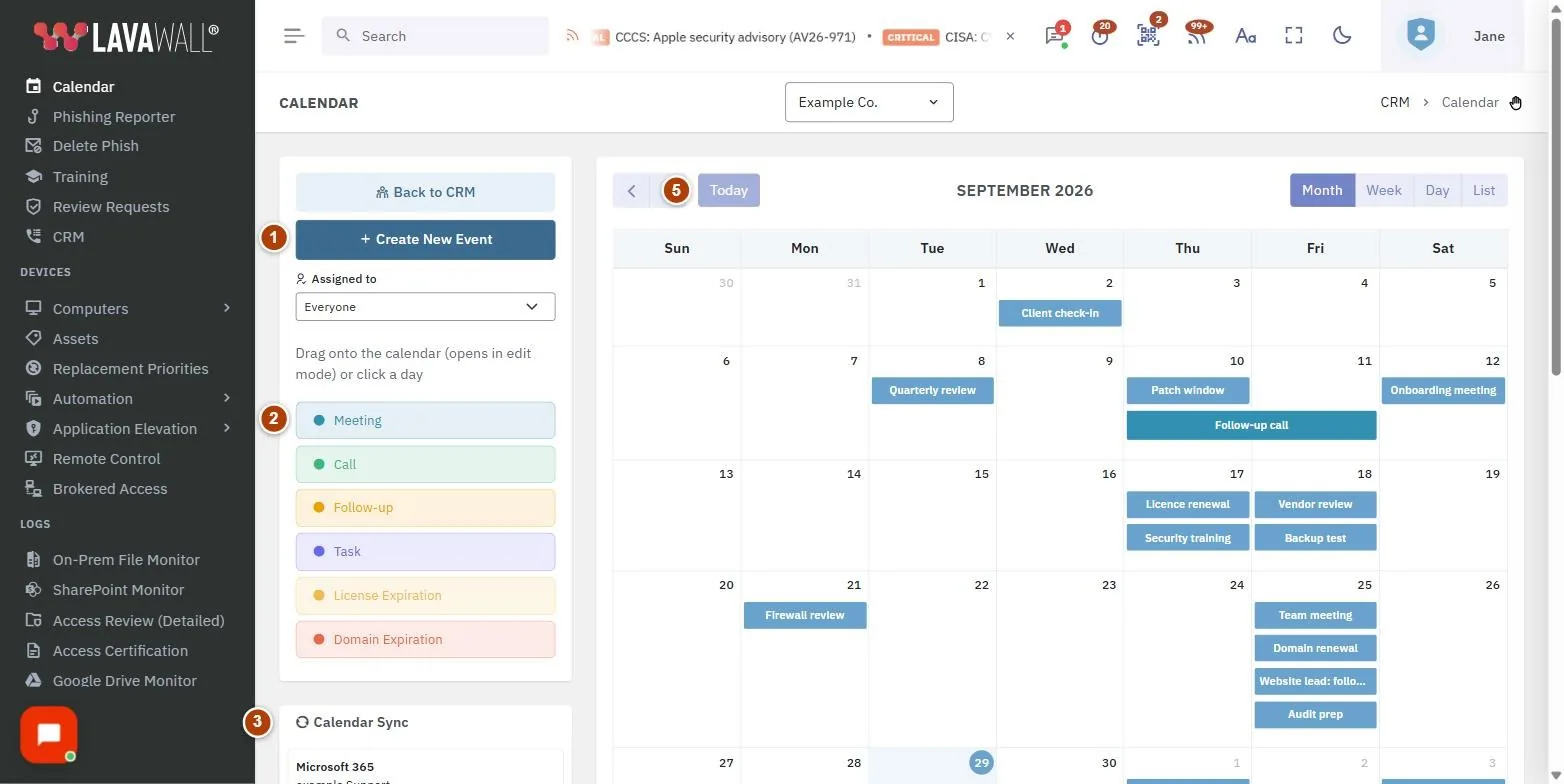
- Toolbar: Back to CRM, Create New Event and the Assigned to filter (Everyone, Unassigned or a team member).
- Event types: Meeting, Call, Follow-up, Task, License Expiration and Domain Expiration, colour coded. Drag one onto the calendar to create that kind of event.
- Calendar Sync: the linked mailboxes, when they last pulled and pushed, Link a mailbox…, Sync now and Unlink.
- Upcoming: the next 14 days of events, follow-ups and scheduled tickets.
- Calendar: month, week, day and list views, with today and previous/next buttons.
How to create an event
- Select Create New Event, click a day, or drag an event type onto the calendar.
- Choose the Type and enter a Subject.
- Optionally pick the Client / Company, Contact and Attendees. Use New company or New contact to add one on the spot.
- Set the Date, Time and Duration (min).
- To set a reminder to follow up, fill in Follow up with, Follow-up date and Follow-up note.
- Choose who it is Assigned to, and add a Description.
- Select Save.
How to create a recurring event
- In the event form, choose how often under Repeat, for example Weekly, Monthly or Annually.
- Pick the Repeat until date (up to two years ahead).
- Select Save.
How to reschedule or delete an event
- Drag the event to a new day or time. Or click it, change the Date and Time, and select Save.
- To remove it, click the event and select Delete.
How to link your calendar to a mailbox
- Under Calendar Sync, choose Microsoft 365 or Google.
- Select Link a mailbox…, search for the mailbox and select Link.
- The calendar is pulled within about 30 seconds. Select Sync now to request a sync straight away.
- To stop syncing, select Unlink and confirm. Existing CRM entries are kept.
How to work through follow-ups
- Look for follow-ups in Upcoming or on the calendar. Overdue follow-ups are shown in red.
- Click a follow-up to open it. Follow-ups from notes can be marked done with Mark done.
- Click a scheduled ticket to open it in the ticket list.
Tips
- Use Assigned to to see one technician's schedule, or Unassigned to find work that nobody owns yet.
- Add licence and domain expiry dates as events so renewals appear in Upcoming.
- Scheduled tickets are shown for information and cannot be dragged here. Change their time from the ticket.
- Your browser's time zone is recorded for the linked calendar so times line up correctly.
Troubleshooting
- A red banner says the calendar has a permission problem. Re-authorize the Microsoft 365 or Google Workspace connection, then select Retry sync now. The banner clears once a sync succeeds.
- "No eligible mailboxes." No enabled mailboxes were found in the synced Microsoft 365 or Google Workspace data. Connect the tenant first and let it sync.
- "Subject required" or "Date required." Give the event a subject and pick a date.
- "Repeat until required." Pick the last date the event should repeat to (up to two years).
- Google events are not syncing. The Google sync uses the Workspace connection's authorizing administrator. Pick that administrator's mailbox or a calendar shared with them.
Task guides that use this page
Related articles
Still need help?
Search the support centre, or contact our support team and tell us which page you were on.
Names, companies, devices and figures in the pictures are examples. Other product and company names are trademarks of their respective owners.