Tickets
Handle every client support request in one queue, from first email to billed time.
What the page is for
Tickets is your service desk. Requests arrive by email to your support inboxes, from imports such as ZenDesk or HubSpot, or are created by your team. Each ticket records the client company, requester, assignee, category, priority, status, comments and time spent.
You can work the queue as a sortable list or as a board, filter by status, company, agent, tag and date, and act on many tickets at once. Opening a ticket shows the full conversation, attachments, a timer, related items and an AI analysis that pulls out tasks, calendar items and tips.
The page also holds your help desk setup: support inboxes and email sending, categories, priorities, imports and automatic email classification. A Billing view totals billable time per client each month against the service plan you assign to them.
What you see
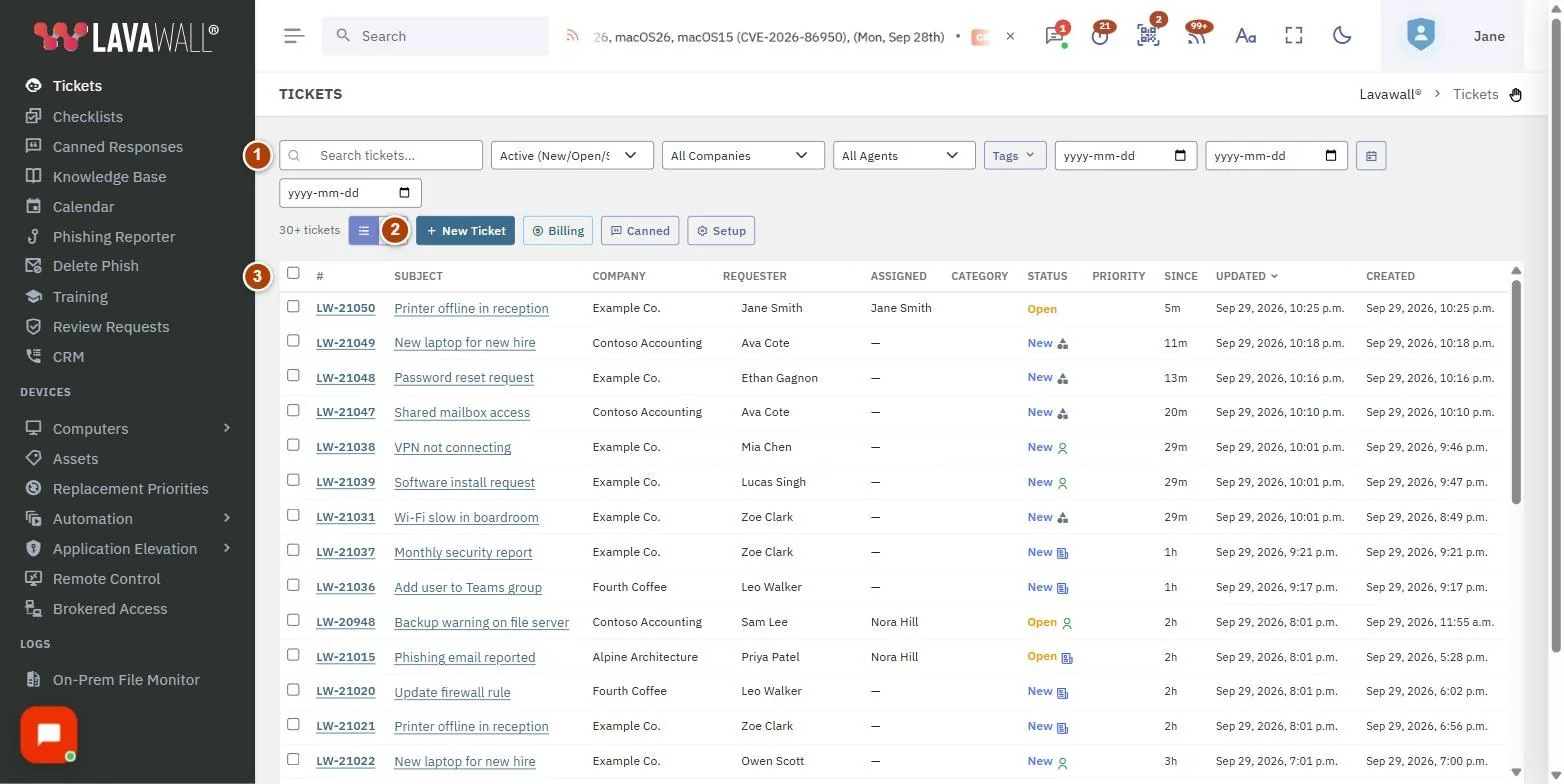
- Toolbar: Search tickets..., status, company, agent and Tags filters, a date range, list or board view, and the New Ticket, Billing, Canned and Setup buttons.
- Bulk action bar: appears when you tick tickets: set status, assign, set priority, Apply, Merge or Cancel.
- Ticket list: #, Subject, Company, Requester, Assigned, Category, Status, Priority, Since, Updated and Created, loading more as you scroll.
- Ticket window: subject, status and classification flag, Details & Edit fields, AI Analysis, Comments, attachments and the reply box.
- Time and related work: timer with Start, pause and stop, manual time entries, and Add child, Merge and delete buttons.
How to use this page
How to create a ticket
- Select New Ticket.
- Choose the Company and Requester (type to search), and enter the Subject and Description.
- Set Status, Assigned To, Category and Priority, and add CC (comma-separated) addresses if needed.
- Tick Private (don't notify requester) if the requester should not be emailed.
- Select Save.
How to find and sort tickets
- Type in Search tickets... to search.
- Use the status list. Active (New/Open/Scheduled) is the default; other choices include Human Only (no automated), individual statuses, and classification tags such as Likely spam.
- Narrow by All Companies, All Agents (Unassigned or Assigned to Me), Tags, or the from and to dates.
- Select a column heading to sort. Switch between the list and board views with the view buttons.
- When new tickets arrive, select the new button at the bottom of the list to refresh.
How to reply to a ticket
- Select the ticket to open it.
- Type your reply in the box under Comments. Leave Public ticked to email the requester, or clear it for an internal note.
- Select Send & Close, or use the arrow beside it for Send & Leave Open, Send & Pending or Add Note (no email).
- Open Details & Edit to change status, company, requester, assignee, category, priority, CC addresses or tags.
How to track time
- In the ticket's Time card, select Start to run a timer. Use pause and stop as you work.
- To log time afterwards, enter the minutes and a description, then select the add button.
- Select Billing in the toolbar to see each client's billable time for the month.
How to merge, split or bulk-update tickets
- To combine duplicates, tick them in the list and select Merge, then choose the surviving ticket. The others are merged into it.
- From an open ticket, select Merge to merge it into another ticket, or Add child to create a linked child ticket with its own subject, assignee and priority.
- To update many tickets, tick them, choose Set Status..., Assign To... or Set Priority..., and select Apply.
How to set up your help desk
- Select Setup.
- On Email, create a New Inbox. Each inbox gets its own support address; you can forward your existing support address to it, set a From name, auto-reply and Email signature, and use Domain Routing to map sender domains to client companies (Auto-populate from M365/GW can fill this in).
- On Categories and Priorities, add and colour your categories and priority levels. A lower level sorts as higher priority.
- On Imports, select Seed Defaults for a starter set, or open the ZenDesk and HubSpot imports. You can also turn on ZenDesk Two-Way Sync.
- On Classification, add rules that tag new email as human, automated, newsletter or likely-spam, then select Classify untagged tickets to apply them to older tickets.
How to set up billing plans
- Select Billing.
- Under Service Plans, select the add button and enter the plan name, type (Hourly, Included Hours or Unlimited), rates, Incl hrs/mo, Min bill (m) and whether it is the Default.
- Under Company Plans, assign plans to clients.
- Pick a month to see Used, Included and Remaining time for each company.
Tips
- Your status filter is remembered, so the list opens the way you left it. If your filter returns nothing, the page falls back to All Statuses.
- Use the Flag badge on a ticket to mark it as human, automated, newsletter or spam, with an option to tag similar emails automatically. A manual choice is never overridden by the rules.
- Human Only (no automated) hides alerts and newsletters so you can focus on real requests.
- Internal comments show an Internal badge and are not emailed to the requester.
- To send replies from your own domain, set the From address on the inbox and publish the SPF and DKIM records shown in Forwarding, SPF & DKIM setup help, or replies may land in spam.
- If attended remote support is available to you, Start ad-hoc support in a ticket creates a one-time support code and adds the join link to the ticket.
Troubleshooting
- The list is empty. Check the status, company, agent, tag and date filters. Choose All Statuses and clear the dates.
- "Comment cannot be empty" appears when you send a reply with no text.
- "No requester yet" means the ticket has no requester to email. Choose one under Details & Edit first.
- "Session needs refreshing" means your sign-in token expired. Refresh the page; an unsent reply draft is restored.
- "Ad-hoc support unavailable" means attended remote support is not available for your account.
Task guides that use this page
Related articles
Still need help?
Search the support centre, or contact our support team and tell us which page you were on.
Names, companies, devices and figures in the pictures are examples. Other product and company names are trademarks of their respective owners.