Profile and Security
Keep your contact details current and control how you sign in: password, passkeys, authenticator app and linked Microsoft or Google accounts.
What the page is for
This is your own account page. The left side shows your name and role, and the computers and browsers where you are currently signed in. The right side has tabs to update your personal details, change your password, add passkeys, set up or reset multi-factor authentication (MFA), and link or remove Microsoft and Google sign-in.
If your administrator allows it, a GRC Roles tab lets you record the roles you hold, such as IT Manager or Security Lead. These appear when you sign attestations in the compliance module.
What you see
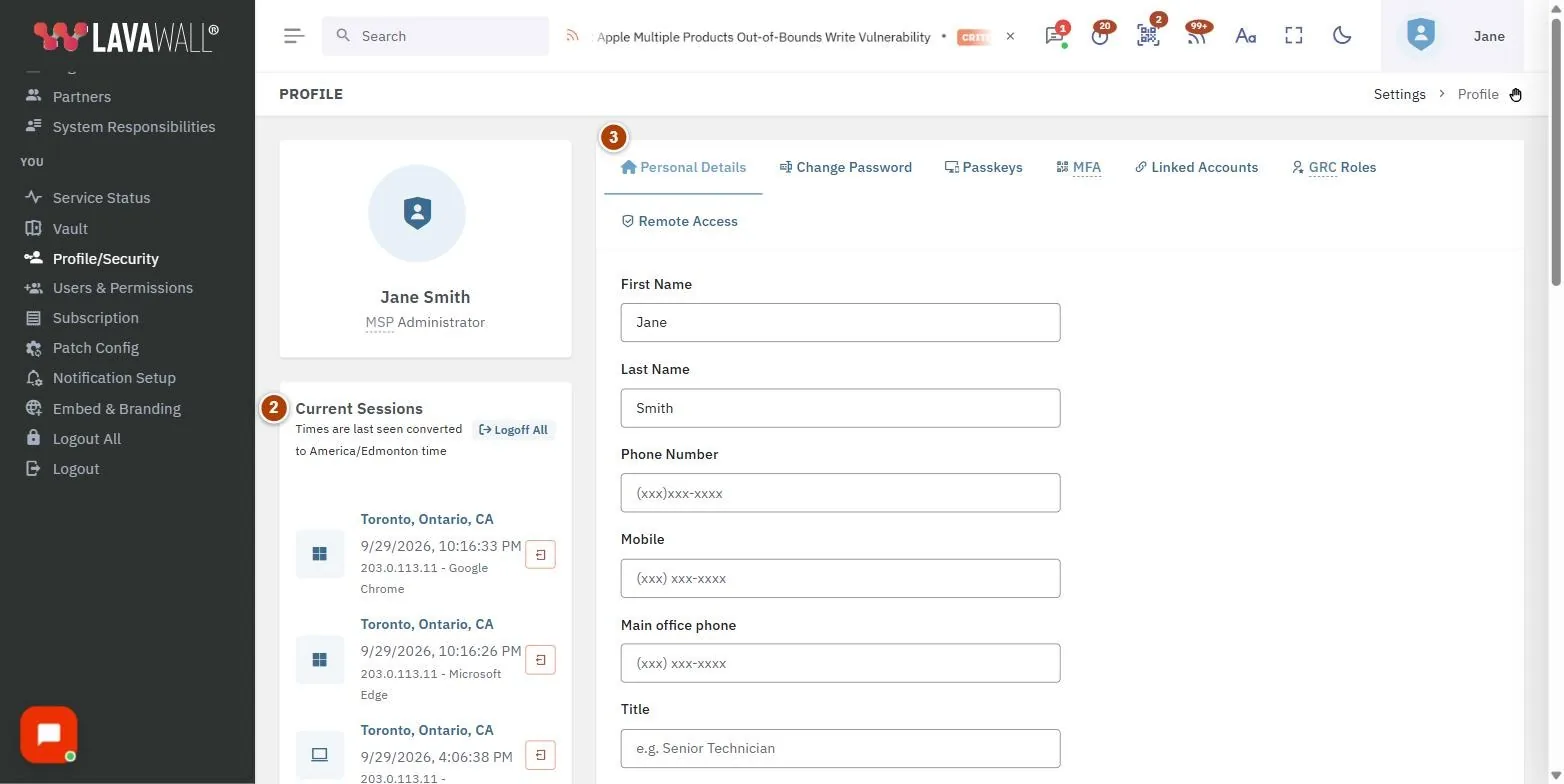
- Your name and role: at the top left.
- Current Sessions: each place you are signed in, with last-seen times in your time zone, and Logoff All.
- Tabs: Personal Details, Change Password, Passkeys, MFA, Linked Accounts, GRC Roles (if allowed) and Remote Access.
- Personal Details form: First Name, Last Name, Phone Number, Mobile, Main office phone, Title, Photo, Email Address, with Update and Revert.
- Linked Authentication Methods: Microsoft 365 / Azure AD, Google, Password and Passkey, each with its status and a Link, Remove, Set password or Add passkey button.
How to update your details
- On Personal Details, change your name, phone numbers, Title or Email Address.
- Optionally upload a Photo. It is used in email signatures, tickets and chat.
- Click Update. Click Revert to undo changes you have not saved.
How to change your password
- Open Change Password.
- Enter your Old Password, then the New Password twice.
- Click Change Password. If you have forgotten it, click Forgot Password and type the confirmation code shown.
How to add a passkey
- Open Passkeys.
- Click the add button and follow your browser's prompt to use your fingerprint, face, Windows Hello, phone or a hardware key.
- Your new passkey appears under Saved Passkeys. If your organization requires a certain kind of security key, the tab tells you which kinds are accepted.
How to set up or reset MFA
- Open MFA.
- If MFA is not set up, click Click here to set up Multi-Factor Authentication and scan the code with your authenticator app.
- To move to a new phone, click Reset and type the confirmation code shown, then set it up again.
How to manage trusted computers and sessions
- On the MFA tab, Trusted computers lists browsers where you chose to remember the computer. Click Revoke on one, or Revoke all; those browsers will ask for your authenticator code next time.
- In Current Sessions, end a single session, or click Logoff All to sign out everywhere.
How to link Microsoft or Google sign-in
- Open Linked Accounts.
- Click Link beside Microsoft 365 / Azure AD or Google and sign in with that account.
- To stop using one, click Remove and confirm. You cannot remove your only way to sign in.
Tips
- Add at least two sign-in methods, such as a passkey and a password with MFA, so you are not locked out if one stops working.
- If you signed up on a mobile device and postponed MFA, a coloured banner on the MFA tab counts down the time left to set it up.
- Changing your password cancels every remembered trusted computer.
- The Remote Access tab opens the Access Policy page, which only administrators can change.
Troubleshooting
- "That is the only way in." You tried to remove your last sign-in method. Add another method first.
- "Please type the correct confirmation code…" The code you typed did not match the one shown. Try again.
- "Browser too old." Your browser cannot run the secure password step. Update your browser.
- A security key is refused. Your organization may require a certified hardware key. The Passkeys tab shows the accepted kinds.
Task guides that use this page
Related articles
Still need help?
Search the support centre, or contact our support team and tell us which page you were on.
Names, companies, devices and figures in the pictures are examples. Other product and company names are trademarks of their respective owners.