Client Billing
Set up how you bill each client once, so invoices build themselves from live device and licence counts.
What the page is for
Client Billing is where you configure billing for the clients you manage. You define the tax regions you collect in, the products and services you sell, optional bundles, reusable templates, and a billing agreement for each client.
Each agreement is built around a service plan (hourly, included hours per month, or unlimited support) and can add lines billed per workstation, server, device, user or product. Quantities can come from live counts, such as Huntress agents, Sophos seats, Datto RMM endpoints, Microsoft 365 or Google Workspace assigned licences and device counts, so the invoice follows what the client actually uses.
You can bill entirely inside Lavawall or connect QuickBooks Online for two-way sync of customers, items and invoices. A setup checklist and wizard walk you through it in order. Invoices themselves are previewed and generated from the Billing Summary page.
What you see
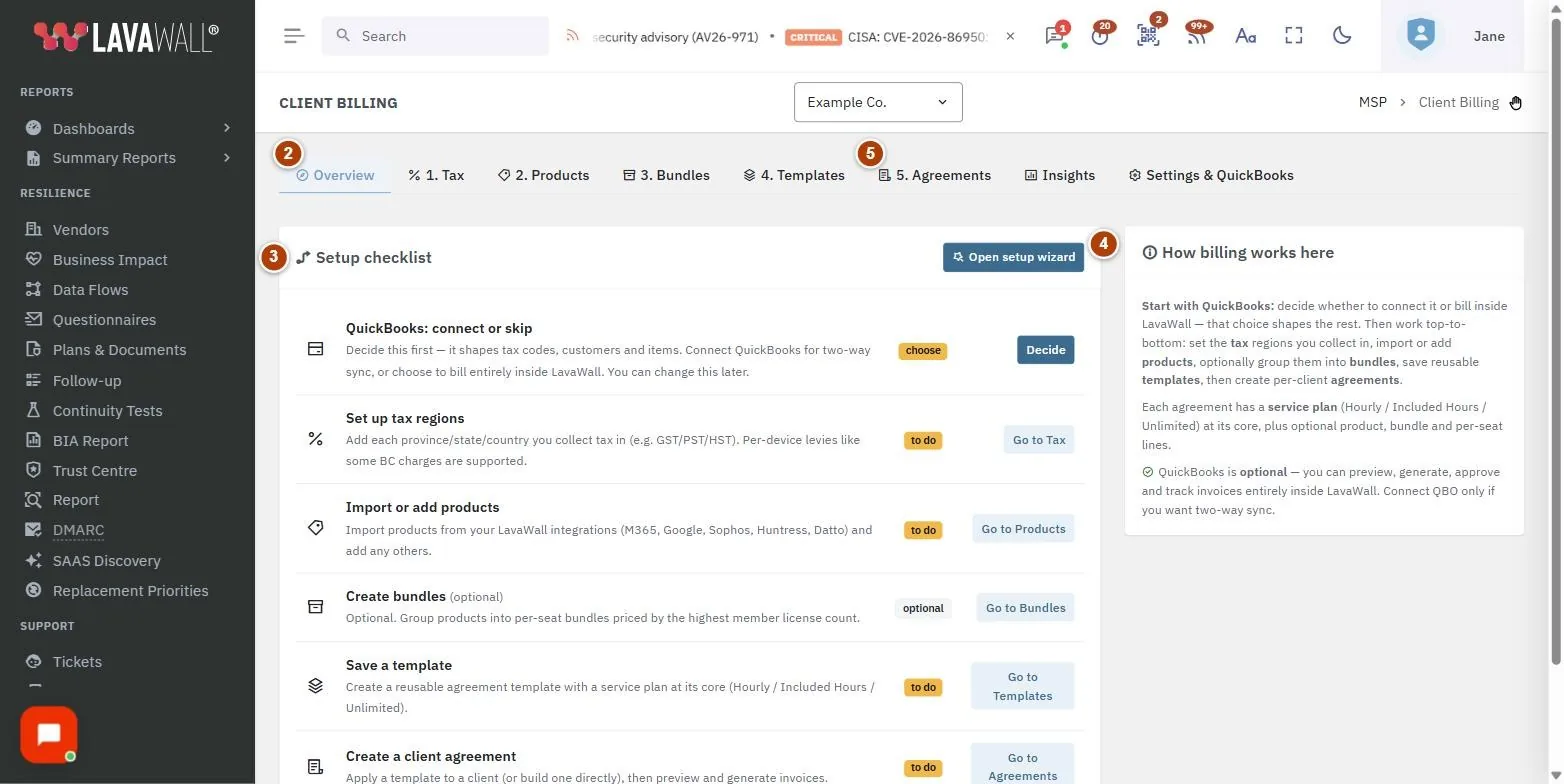
- Client banner: "Managing billing for" the selected client, with View all clients.
- Tabs: Overview, 1. Tax, 2. Products, 3. Bundles, 4. Templates, 5. Agreements, Insights and Settings & QuickBooks.
- Setup checklist: each setup step marked done, skipped, optional or to do, with Open setup wizard.
- How billing works here: a short guide to the order of setup.
- Agreements: Client, Name, Status, Period, Lines and Actions, with New from template and New agreement.
How to use this page
How to get started with the setup wizard
- On Overview, select Open setup wizard.
- Choose Connect QuickBooks for two-way sync, or Use LavaWall only to bill inside Lavawall. You can connect later.
- Work through the steps in order: Set up tax regions, Import or add products, Create bundles (optional), Save a template and Create a client agreement.
- The checklist updates automatically as you configure each step.
How to set up tax regions
- Open 1. Tax and select New region.
- Pick the Country and Province / State. The label fills in from your selection.
- Tick We collect/remit tax here if you collect tax in that region.
- Add rate components such as GST, HST, PST or QST with a Rate % and Effective from date. Use a per-device amount for levies charged by the number of devices in the region.
How to add products and bundles
- Open 2. Products. Select Import from LavaWall to create products from integrations you have already set up, or New product to add one.
- Enter the name, Category, SKU, Count source, Unit cost ($) and Unit price ($). The count source decides where the quantity comes from, for example Sophos seats or Workstations.
- To group products, open 3. Bundles, select New bundle, choose the Pricing basis and tick the Member products.
How to create a client agreement
- Open 5. Agreements and select New agreement, or New from template to start from a saved template.
- Choose the client, name the agreement and set the status (Draft, Active, Paused or Ended), period (Monthly, Quarterly, Annual or One-time) and timing (Arrears or Advance).
- Pick the Default tax region, and optionally a PO number, Start, End, Auto-invoice and Notes.
- Under Service plan, choose an existing plan or set a plan type with its rates, Included hrs/mo and Min billable (min).
- Select Add line to add product, bundle, per-seat, prepaid or discount lines. Set Qty basis to Auto (live counts) or Manual.
- To invoice, select the invoice button on the agreement's row. It opens Billing Summary for that client.
How to connect QuickBooks Online and set billing defaults
- Open Settings & QuickBooks.
- Select Connect to QuickBooks and approve access. Then use Import customers and Sync products as needed.
- Under Billing settings, turn on Billing enabled (required to generate invoices), and set Invoice timing, Generate day, Send day, Terms, billing contact and Invoice footer. Select Save settings.
- Under Distributors, enter your Ingram Micro or TD SYNNEX credentials to look up current MSRP and your cost by part number.
Tips
- Start with the QuickBooks decision. It affects how you set up tax codes, customers and items.
- For Unlimited plans, the regular hourly rate field is the flat monthly price. For Included hours, it is the monthly fee for the block, and overage bills at the after-hours rate.
- A bundle's billed quantity is the highest live count among its checked products.
- On Insights, the licence renewals list colours recently renewed licences green and ones renewing soon amber or red. Change the Window from 30 to 90 days.
- Most MSPs connect QuickBooks with the button alone. Use my own Intuit app (advanced) is only for firms that want their own app and rate limits.
Troubleshooting
- "This page is for MSP accounts." Client billing is only available to managed service provider accounts.
- "You don't have billing access." Ask a Super Admin to grant a billing permission for your user.
- "No agreements yet." Create one with New agreement, or save a template first and use New from template.
- "No products yet: create products first, then add them to a bundle." Add products on 2. Products before building bundles.
- "Open a specific client to see licenses." The Insights licence view needs a single client selected.
Task guides that use this page
Related articles
Still need help?
Search the support centre, or contact our support team and tell us which page you were on.
Names, companies, devices and figures in the pictures are examples. Other product and company names are trademarks of their respective owners.