Incident Response
Build an incident response plan with every reporting deadline and contact your rules require, track a live incident against those deadlines, and rehearse the plan with tabletop exercises.
What the page is for
When something goes wrong, the hardest part is often not the technical fix. It is knowing who has to be told, and by when. Visa expects to hear within three calendar days, American Express within 72 hours, NYDFS within 72 hours of determining an incident occurred, a NIS2 entity within 24 hours, and a DORA financial entity within four hours of classifying an incident as major. Each deadline starts from a different moment.
The page has three tabs:
- Plans: a plan builder that adds every regulator's and card brand's reporting deadline and contact for the rules you follow, your own notifications, and breach playbooks for the services you use, and prints a complete plan.
- Incident log: a record of each incident with a timeline and a reporting clock for every report that applies, counting down from the times you record.
- Tabletop exercises: facilitator guides built from your plan, recorded in Continuity Tests.
An approved plan counts as evidence for the incident response controls, such as IR-001 Incident Response Plan, IR-003 Incident Response Testing, and REG-001 Regulatory Cybersecurity Incident Reporting, in every framework that maps them. For an overview, see Incident response in Lavawall.
Checked at the source. Every deadline and contact comes from the regulator's or card brand's own published text, names its section, and links its source. They were last checked on 7 October 2026. Where a brand does not publish a deadline (Discover, JCB, and UnionPay), the plan says so and tells you to confirm with your acquirer. The plan is a tool, not legal advice.
Rules the plan covers
- Payment cards: PCI DSS v4.0.1 requirement 12.10, with incident contacts and deadlines for Visa, Mastercard, American Express, Discover, JCB, and UnionPay, and your acquirer.
- Canada: PIPEDA, the proposed PPCDA (Bill C-36), Quebec Law 25, Alberta PIPA, CIRO's three-day rule for investment dealers, the Canadian Securities Administrators (Staff Notice 33-322 and marketplace rules), the Critical Cyber Systems Protection Act (enacted, not yet in force), and voluntary reports to the Canadian Centre for Cyber Security.
- European Union: NIS2, DORA, and the GDPR.
- United States: the FTC Safeguards Rule, NYDFS Part 500, CJIS Security Policy v6.1, TSA pipeline security directives, NERC CIP-008 and DOE Form OE-417, HIPAA with Health Sector Coordinating Council guidance, Iowa public sector and Iowa breach law, IRS Publication 1075, and voluntary reports to CISA.
- Frameworks: CIS Controls v8.1 Control 17 and the Cloud Security Alliance Cloud Controls Matrix.
Proposed and not-yet-in-force rules are marked as such. Including them now means the plan is ready the day they take effect. Notices that apply only in the United States, such as voluntary reports to CISA, appear only when you tick We operate in the United States.
What you see
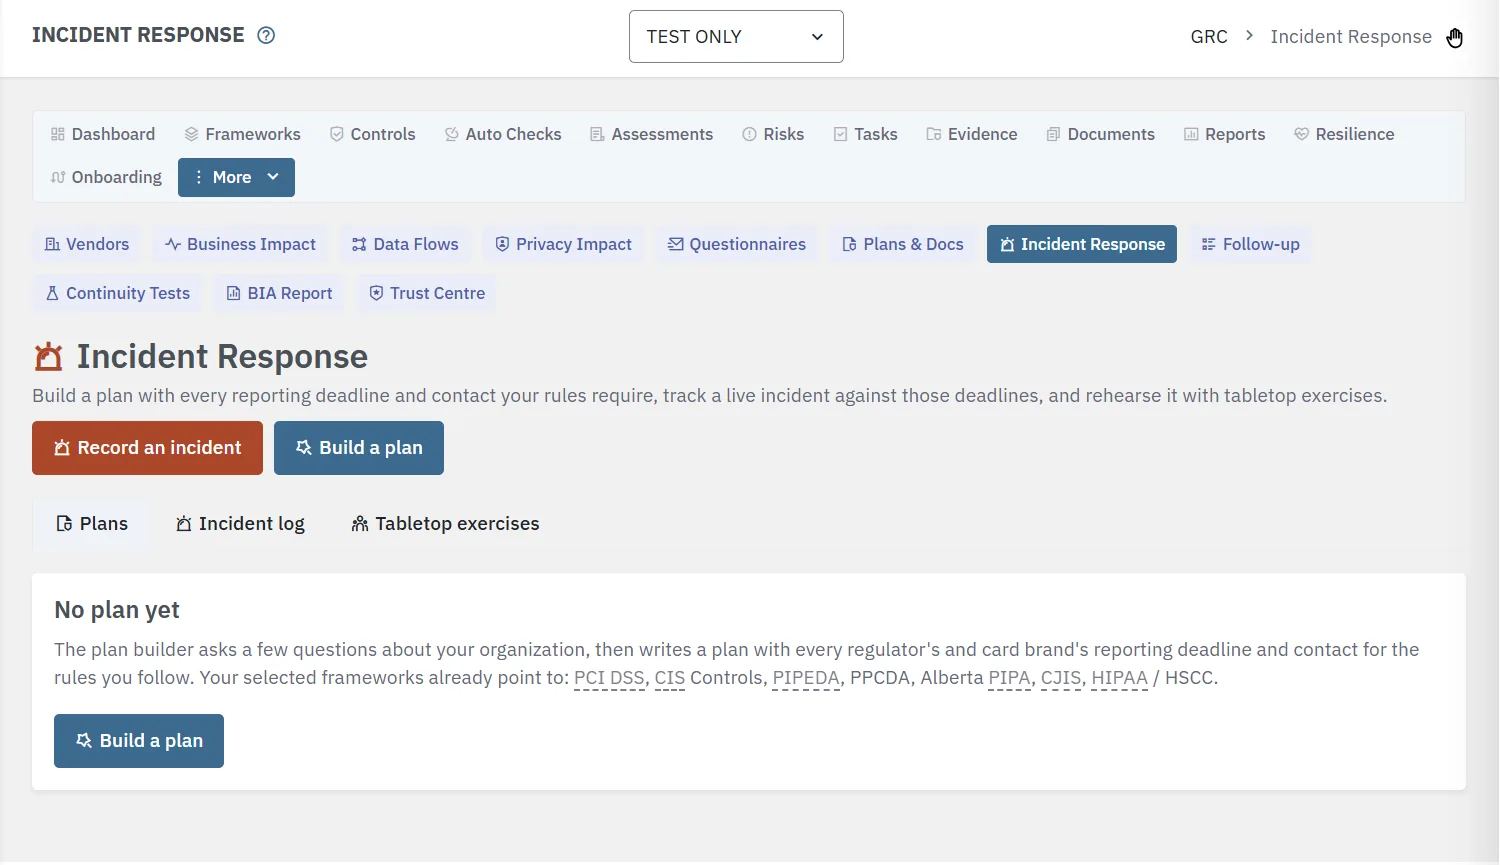
- Record an incident and Build a plan: the two buttons at the top of the page.
- Plans tab: Plan, Rules covered, Status, Last tested (with Test due when it is overdue), Next review, and Updated.
- Incident log tab: Incident, Severity, Status, Discovered, Next deadline (with a countdown), and Lead.
- Tabletop exercises tab: Plan to exercise, six scenarios with Open the facilitator guide, and Recent tabletop exercises.
Changes save as you make them. Every field on a plan, in the section editor, and on an incident saves on its own a moment after you change it. A small Saved note appears beside the field, or Not saved: with the reason and Try again. There are no Save buttons, and nothing is lost when you leave the page.
How to build a plan
- Select Build a plan.
- Tick what describes your organization, for example We accept or process payment cards or We operate in Canada. The answers your selected frameworks point to are already ticked and marked from your frameworks. Select Next.
- Check the rules the plan will cover. Rules from your selected frameworks and your answers are already ticked, marked selected framework where a framework put them there. Select Next.
- If PCI DSS is ticked, tick the card brands you accept and choose your Acquirer or payment processor. Type part of a name or a country to search the list of banks and processors in Canada, the United States, the United Kingdom, Europe, Australia, New Zealand, Mexico and other countries. The contact each one publishes appears below the list, and its published phone and email are filled in under Incident phone for your acquirer and Incident email for your acquirer. If your acquirer gave you a different incident line, type over them. If yours is not in the list, choose Other (enter the name). Select Next.
- Enter the plan name, the Incident lead (you are filled in to start with), Deputy incident lead, Technical lead, and Executive sponsor, and your cyber insurer and forensic firm if you have them. Select Create plan. The plan opens as a Draft, with the services Lavawall already sees you using listed under Services we use.
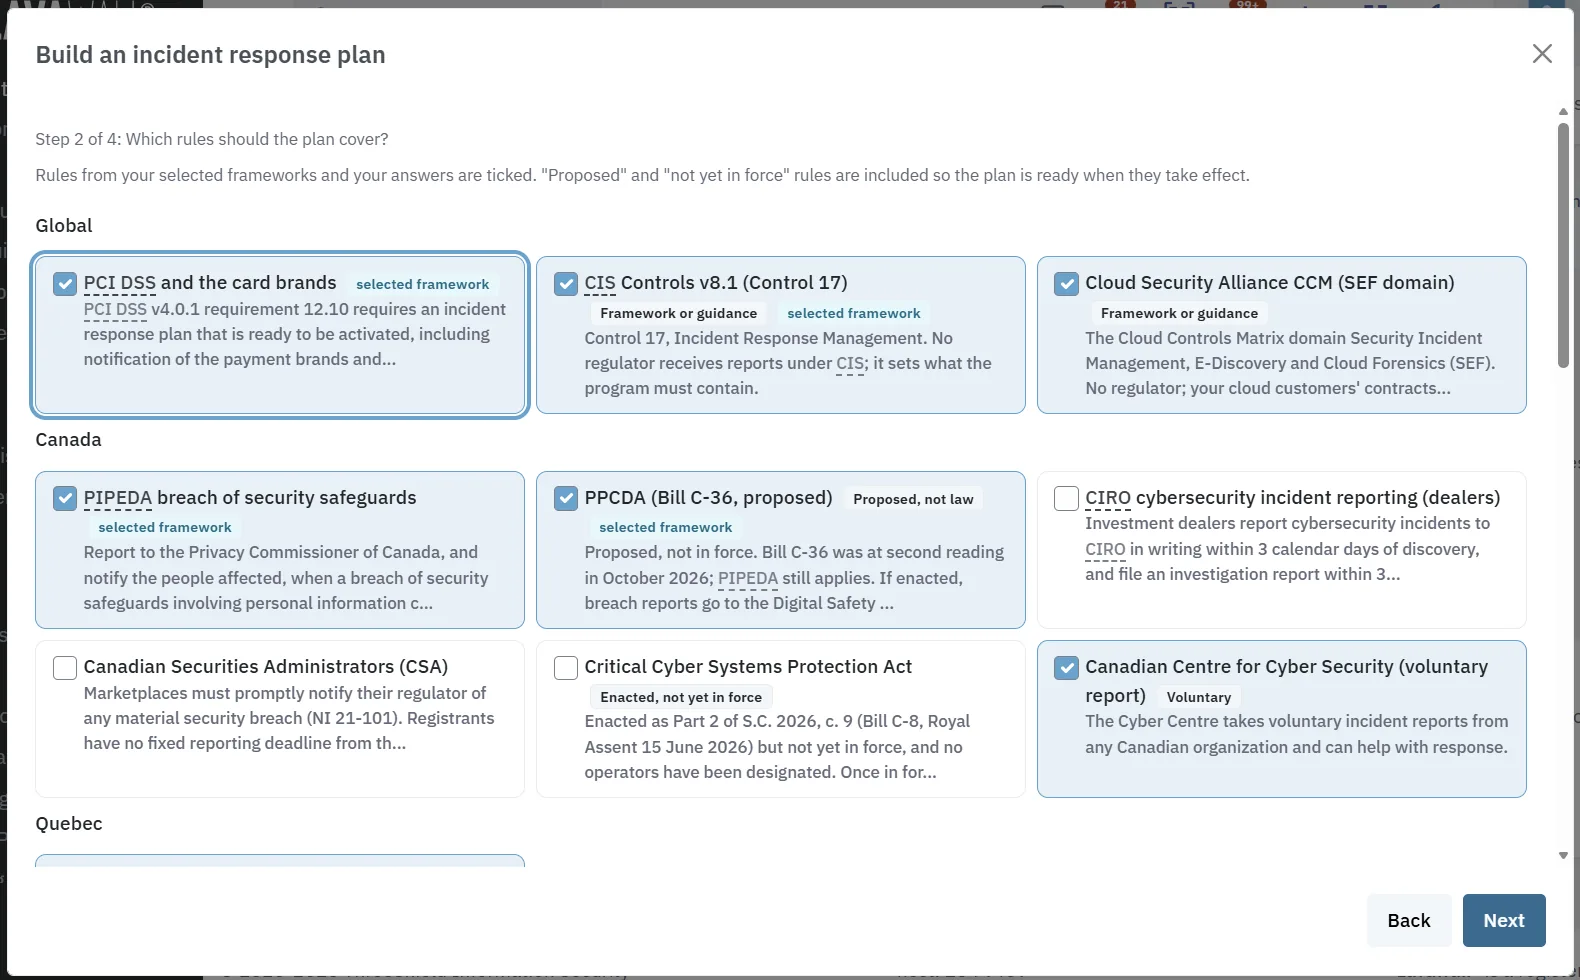
About acquirer contacts. Most acquirers publish only a merchant support line, not a separate line for data breaches. The list says which kind each contact is, and where it came from. Ask your acquirer for its incident contact and type it over the published one: that is the number the plan prints as the one you were given. If what you typed differs from the published contact, the plan offers Use the published contact instead. Merchant IDs are stored encrypted. They print at the top of the plan and show under Who to call on an incident, but never in the plan's section text, in emails, or in a reviewer's copy.
How to complete the plan details
- Under Incident response team, fill in every role with a phone number that works at 2 a.m. Select Add a person for anyone else, and Remove for a role you do not use.
- Under Other contacts, add your insurer, forensic firm, legal counsel, and police. Government help is filled in for you as a list of the national centres for each country your rules cover.
- Under Who must be told, and how fast, each citation links to its source. Where a row says "your CSIRT" or "your competent authority", write which one is yours in Our recipient or note. It prints in the plan and shows on the incident's reporting clocks. To leave a report out, see how to choose which notifications are in the plan.
- Under Services we use, check the services the plan has playbooks for. See how to choose services and their playbooks.
- Tick the Playbooks to include, and enter the Plan owner and Next review date. Each change saves on its own.
Phone numbers in the plan (the team, other contacts, government help, acquirers, and service playbooks) are links. On a phone, tap one to call.
How to choose services and their playbooks
Lavawall has breach playbooks for about 470 services: Microsoft 365, Google Workspace, AWS, your Lavawall account itself, HubSpot, Salesforce, and popular CRM, accounting and ERP, marketing, and productivity tools, AI agents and AI model providers, about 100 website hosts, about 60 domain registrars, Cloudflare, about 50 web application firewalls, and email security filters. When a plan is created, the services that SaaS discovery, the Microsoft 365, Google Workspace, and AWS connections, and the domain scan (registrar, name servers, mail provider, web host, and web firewall) show you use are switched on.
- Open the plan and find Services we use.
- Open Why these were added to see what found each service.
- To add a service, search the Services list by name or kind of service. To add one that is not listed, type its name and choose Add "…" as a service we use. Check the Name, choose the Kind of service, add How to reach them about a breach (optional), and select Add it. The plan gives it the general steps for that kind of service.
- To remove a service, remove it from the list. A service that was found automatically stays off the plan after you remove it.
- If Lavawall finds more services later, a notice says Found since this plan was set up. Select Add them, or Not used here to leave them off.
Each chosen service gets a playbook under Playbooks for the services we use in the plan document: who to report to at the vendor, the logs to collect, and the steps to contain an account there. On an incident, choose the Services affected and each one's playbook appears under Service playbooks.
How to choose which notifications are in the plan
- Under Who must be told, and how fast, every report for the plan's rules has In plan ticked.
- Untick In plan to leave a report out of the printed plan. The plan lists it separately as left out by decision.
- On an incident, left-out reports still appear, last, under Left out of your plan, so you can check whether they apply to this incident.
How to add your own notifications
Use Our own notifications for anyone else you must tell: customers whose contracts set a notification time, a parent company, a franchisor, or a state attorney general.
- Under Our own notifications, select Add a notification.
- Fill in Who to tell and What to send.
- Under Deadline, enter a number, choose hours, days, or business days, and choose from discovery or from determination.
- Add the Wording or condition and the Contact. Select Remove to delete a row.
A notification with a deadline gets its own reporting clock on every incident under the plan, and can be marked filed like any other report.
How to edit the plan document
Under The plan document you see the plan exactly as it prints, section by section. Every section can be edited in the rich-text editor.
- Select Edit beside a section and change the text. It saves as you type. Select Done when you finish.
- A section nobody has edited is written from the plan details and follows every change to them. An edited section keeps your wording. If the plan details change afterwards, it is marked Out of date.
- To go back to the text written from the plan details, select Rebuild from plan details. To bring back earlier wording, open Edit and choose a version under Start from. The last five versions of each section are kept.
- Links must start with https://, mailto:, or tel:. Pictures are not kept, so link to them instead.
The incident page and the approval check read the team and contacts from the plan details, so change people there rather than only in the document.
How to send a plan for review and approve it
- Select Send for review. Under Reviewers, search by name or email. The list shows people who can approve plans in Lavawall, your other Lavawall users, people in your Microsoft 365 or Google Workspace directory, and people who reviewed a plan before.
- To add someone who is not listed, such as an owner, a board member, or outside counsel, type their name or email address and choose Add "…" as a new reviewer.
- People who can approve plans in Lavawall get an email with a link to the plan. Everyone else is listed under By private link with their Name, Email, and Job title. Tick Can approve to let that person approve the plan themselves.
- Set Link open for (days) (14 to start with, up to 90) and Visits allowed (5 to start with, up to 50). Add a Message (optional) if you like, and select Send.
- The plan moves to In review. The Review card shows who was asked, when, and whether each email was sent. Select Resend to send it again (at most once every five minutes per person), or Change reviewers to ask someone else.
- A reviewer in Lavawall opens the plan and selects Approve, or Return for changes with a note. The person who asked for the review is emailed either way.
- Approval needs the incident lead's name and phone number. If any edited section is out of date, the approver sees which and confirms before approving.
- If you wrote or last changed the plan, someone else has to approve it, unless your administrator allows self-approval in Compliance Settings.
- Changing an approved plan sends it back to In review and clears the old review, so send it for review again.
Who can tick Can approve. Only someone who can approve plans can let a reviewer approve. Unless your administrator allows self-approval, the sender must not have written or last changed the plan, and the reviewer cannot be anyone who sent, wrote, or last changed it. The plan also needs an incident lead with a phone number, and no edited section can be out of date.
The same Add "…" as a new reviewer option is in the Send for review dialog on the Documents page.
What a reviewer with a private link sees
- The reviewer opens the link in the email and selects Email me a code.
- They enter the six-digit code under Enter the code and select Continue.
- They read the plan exactly as it prints, without merchant IDs.
- With Can approve, they choose Approve the plan or Changes needed. Otherwise they choose No changes needed or Changes needed. Comments are required when changes are needed.
- They type their name under Type your full name to sign and select Submit review. The answer is recorded with the time, their IP address, and their browser.
An approval by link approves the plan, and the plan's approval line shows who approved it through a review link. Changes needed from a reviewer who can approve returns the plan for changes. Other answers are passed on to the person who sent the link.
On the Review card, By private link lists each link with when it was sent, the visits used, its status, and the answer. A status of Waiting for an answer, Link expired, Visits used up, or Plan changed since sent: resend tells you where it stands. Select Send a new link or Revoke. Links close when the plan is approved, returned, retired, or deleted, and a link shows nothing once the plan changes after it was sent.
Select Printable plan and use your browser's print dialog to save it as a PDF. Keep a printed copy where you can reach it if your systems are down. Links print with their full address.
What the printed plan contains
Your merchant IDs at the top (if you entered any), purpose and scope, the team, how to activate the plan and the severity levels, a table of every report with its recipient, deadline, contacts, and your own recipient notes, your own notifications, a list of reports left out by decision, a payment card section with your acquirer, each brand's rules and forensic investigation requirements, other contacts with government help by country, the playbooks, playbooks for the services you use, communications, evidence and records, recovery, testing and lessons learned, what each set of rules expects of the plan, and the sources.
How to record an incident
- Select Record an incident as soon as you suspect one. You can change everything later.
- Enter a short name, choose the Kind of incident (type to search the list), the Severity, and when it was Discovered. Add when it was Determined to be an incident if that has happened.
- Choose the Plan. Without a plan, the incident uses the rules your selected frameworks point to, so the reporting clocks still run.
- Tick what is involved as far as you know, describe What happened in the rich-text editor, and select Record incident.
- The incident opens with Reporting clocks at the top. Work down the list: the soonest deadline is first.
How the reporting clocks work
- Each row shows the report, who receives it, when it is due in your time zone, and a countdown. Open the row to see the rule's wording, its section, how to file, and the contacts.
- To file means the report applies. Check means it depends on a fact you have not recorded yet, such as whether personal information is involved or how many people are affected. Does not apply means the facts rule it out.
- Some clocks wait for a time you have not recorded, such as Determined to be an incident, or for an earlier report to be filed. The row says what it is waiting for.
- Your own notifications from the plan have their own clocks and can be marked filed.
- Reports the plan leaves out are shown last, under Left out of your plan.
- Times are entered in your time zone and stored in Coordinated Universal Time (UTC), so everyone sees the same deadline.
How to mark a report filed
- Select Mark filed on the row.
- Check When it was filed, add a reference number if you have one, and select Record. The report shows Filed, and any report that depends on it starts its own clock.
- If you marked the wrong report, select Withdraw and say why. Both entries stay on the timeline.
How to keep the record up to date
- Under What we know, update the times, the facts, the status, What happened, and the Lessons learned. Each change saves on its own. A change to a time, the severity, a fact, the services affected, or the rules that apply is written to the timeline automatically.
- Choose the Services affected. Each one's playbook appears under Service playbooks.
- Under Timeline, add each action, decision, or note as it happens with Add to timeline. Leave When blank for now, or enter an earlier time.
- Follow the Playbook for the kind of incident. Who to call lists the plan's team, your acquirer and its published contact, merchant IDs, insurer, forensic firm, counsel, police, and anyone else the plan says to tell. Tap a phone number to call it. The plan shows every section as it prints.
- Select Incident report for a printable record of the facts, every report with its deadline and when it was filed, and the full timeline, for your insurer, a regulator, or your files.
- Set the status to Closed when the incident is over, and record the lessons learned.
How to run a tabletop exercise
A tabletop is a discussion, not a test of systems: the team talks through a realistic incident using the plan. PCI DSS, NYDFS, DORA, CJIS, IRS Publication 1075, and CIRO all expect one at least once a year, and NERC CIP-008 every 15 months. The six scenarios are ransomware, card skimming on a checkout page, a redirected supplier payment, a breach at a cloud provider, a stolen laptop, and a denial of service with an extortion demand.
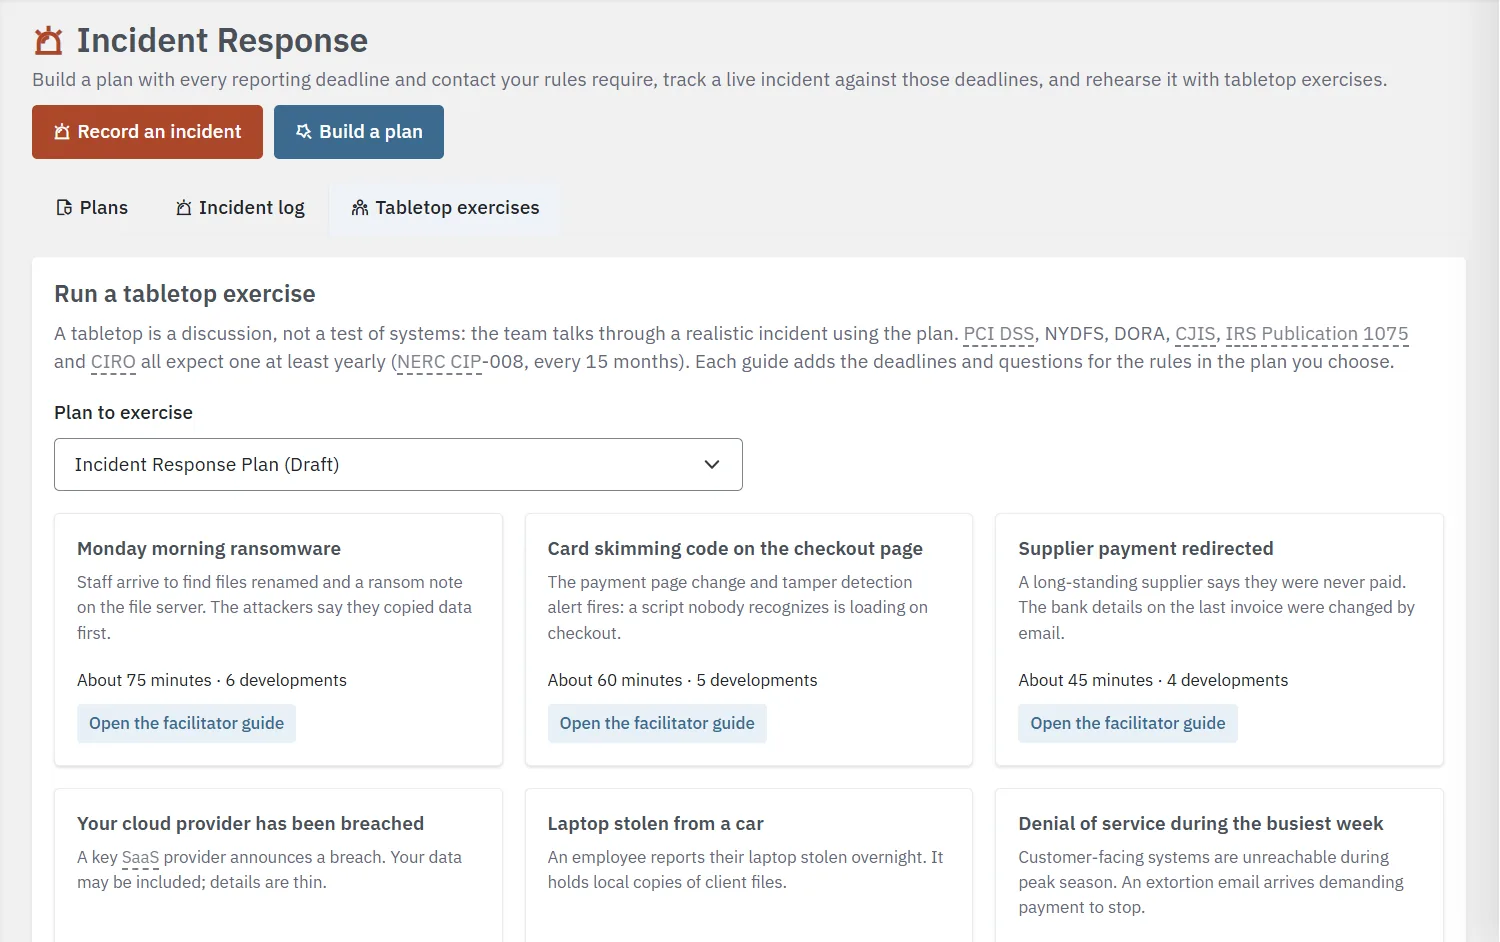
- Open the Tabletop exercises tab, choose the Plan to exercise, and select Open the facilitator guide on a scenario.
- Read Before the exercise, and select Printable guide for the facilitator.
- Run the exercise, revealing each development at about the minute shown. The guide adds questions and the deadlines the scenario would set off for the rules in your plan.
- Under Record the exercise, enter the date, How it went, Who took part, and the Findings, owners and dates. Select Record in Continuity Tests. The plan's last tested date updates, and the next exercise is due when your strictest rule requires.
Where else it appears
- Controls: the incident response controls show an Incident response panel with your plans, when each was last tested, and the incident log's counts. See Control Detail.
- Continuity Tests: recorded tabletop exercises appear with your other tests. See Continuity Tests.
- Plans & Docs: the Incident Response Plan card links here for deadlines, contacts, and tabletops. See Plans & Documents.
Tips
- Record the incident first and investigate second. Several clocks start at discovery, not when you are sure.
- Write down who determined it was an incident, and when. NYDFS, NERC CIP-008, and DORA clocks start from that decision.
- Do not paste card numbers, passwords, or other sensitive data into the incident record. Describe them instead.
- For a card data compromise, isolate the affected systems rather than turning them off or rebuilding them, so a forensic investigator can examine them.
- Changing an approved plan sends it back to In review, so an approval always matches the plan.
- Watch for the Saved note beside a field. If it says Not saved, fix what it says and select Try again. Your browser asks before you leave only when a change could not be saved.
- Send a private link to whoever must sign off but has no Lavawall account, such as an owner or outside counsel, rather than emailing a printed copy. The link shows the plan as it is and records the answer.
Troubleshooting
- "Incident response is not set up yet."
- Your organization's update to this feature has not finished. Ask your administrator, or contact our support team.
- "Name the incident lead and give a phone number, and save, before approving."
- Fill in the Incident lead row under Incident response team, wait for the Saved note, then approve.
- "You wrote this, so someone else has to approve it."
- Ask a colleague whose compliance role includes approving. An administrator can allow self-approval with a reason in Compliance Settings.
- "Incidents were recorded under this plan, so it stays on record."
- Select Retire instead of deleting it.
- A report shows "Check" instead of "To file".
- Record the fact it depends on under What we know, such as whether personal information is involved or how many people are affected. It saves on its own.
- "Your last change could not be saved."
- The note beside the field says why. Fix it and select Try again, then repeat what you were doing. You see this before sending for review, approving, or changing the plan's status, so nothing typed is lost.
- A section is marked Out of date.
- The plan details changed after the section was edited. Read it, then edit it or select Rebuild from plan details.
- A reviewer did not get the email.
- Check the Review card. "Email is turned off in Compliance Settings" means a GRC administrator switched notifications off; "Could not send" means the mail was refused. Select Resend, or tell the reviewer yourself.
- The review link says "The plan has changed".
- The plan was edited after the link was sent, so the link no longer shows it. On the Review card, select Send a new link for that reviewer.
- A private link has expired or its visits are used up.
- Select Send a new link on the Review card. To give more time or visits, change Link open for (days) or Visits allowed when you send.
- I can't tick Can approve.
- Only someone who can approve plans can let a reviewer approve. It also cannot be done when you wrote or last changed the plan (unless your administrator allows self-approval), when the reviewer sent, wrote, or last changed it, when the plan has no incident lead with a phone number, or when an edited section is out of date. Ask an approver to send it, or fix what the message names.
- A deadline is not shown.
- The rule sets no fixed time ("as soon as feasible"), or the clock is waiting for a time you have not recorded. The row says which.
Related articles
Still need help?
Search the support centre, or contact our support team and tell us which page you were on:
- Chat now: use the chat button in the bottom-right corner of this page to reach our team right away. Where cookie consent is needed, the chat starts after you accept (cookie settings).
- Email: send our support team a message through the contact page. It goes straight to a person.
- Phone: AB: 1-403-538-5053, BC: 1-778-731-1339, ON: 1-289-724-8829, US: 1-406-988-7333, UK: +44 20 3695 9786.
Names, companies, devices and figures in the pictures are examples. Other product and company names are trademarks of their respective owners.