Connect Microsoft 365 and review the first findings
Connect a Microsoft 365 tenant and work through the first findings, from incidents to accounts without MFA and risky apps.
A Lavawall® task guide: 8 steps across 6 console pages.
Before you start
- Who can do this: Users with the "authorize Microsoft 365 only" permission (connect without seeing monitoring data); you also need a Microsoft 365 administrator account to sign in
- Plan: Connecting is included; monitoring needs M365 / Google Workspace Monitoring (included in Grow, Professional, and Complete). M365 / Google Workspace Monitoring (included in Grow, Professional, and Complete). M365 Change Monitoring (included in Professional and Complete) or M365, Entra ID & Azure Configuration Backup (add-on, or included in Complete). See pricing.
- Where to start: open Connect Microsoft 365 in your console.
Steps
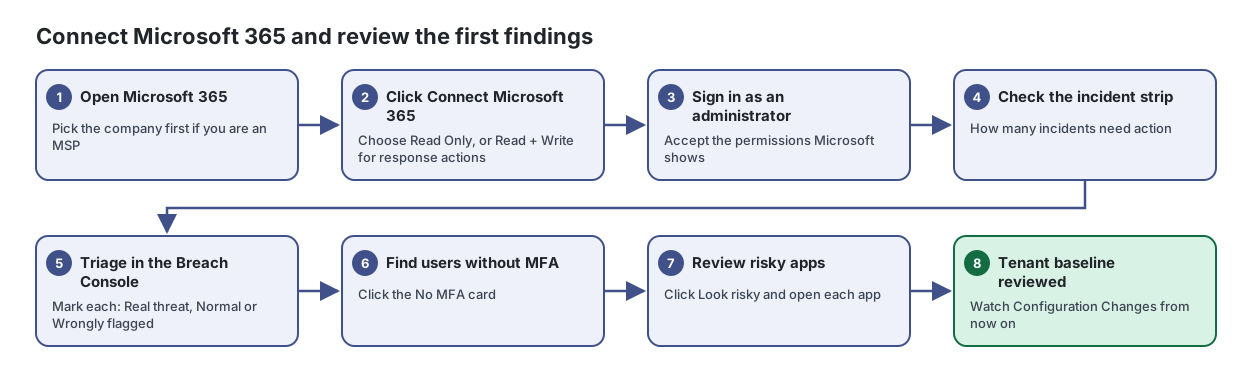
- Open Microsoft 365. Pick the company first if you are an MSP
See the security of your Microsoft 365 tenant at a glance: incidents, users, MFA coverage, connected apps, storage and configuration score.
- Click Connect Microsoft 365. Choose Read Only, or Read + Write for response actions
From the article: How to connect Microsoft 365
- If the page shows Microsoft 365 Not Connected, click Connect Microsoft 365.
- Choose Read Only (monitoring) or Read + Write (monitoring plus response actions such as locking accounts and revoking sessions).
- Sign in with a Microsoft 365 administrator account and accept the permissions.
- Sign in as an administrator. Accept the permissions Microsoft shows
Connect or re-authorize your Microsoft 365 tenant so Lavawall can monitor it, without seeing any monitoring data yourself.
From the article: How to connect Microsoft 365
- Click Connect Microsoft 365.
- In the Microsoft 365 Authorization dialog, choose the access level:
- Sign in with a Microsoft 365 administrator account.
- Review the permissions Microsoft shows and accept them.
- You are returned to Lavawall and the page shows Connected with your tenant.
- Check the incident strip. How many incidents need action
- Triage in the Breach Console. Mark each: Real threat, Normal or Wrongly flagged
Triage suspected Microsoft 365 account compromises, with a plain-language explanation of what happened and what to do next.
From the article: How to triage an incident
- Start on Needs action, sorted Highest risk first.
- Click the investigate button on an incident.
- Read What happened and Why we flagged it, then review the evidence in order.
- Follow the steps in What to do next. Use Full user timeline or Search everything for this user for more context.
- Choose a decision:
- Optionally tick Remember this pattern as normal and add Notes before deciding.
- Find users without MFA. Click the No MFA card
See every user account from Active Directory, Microsoft 365, Google Workspace and local computer accounts in one list, with the risks that matter.
From the article: How to find risky accounts
- Click a summary card, for example No MFA or Inactive 90d+. Click it again to clear.
- Or open Properties and tick one or more options, such as Admin, No MFA, Weak MFA, Never Logged In, Pwd Never Expires, Local Admin, Stale Local, Failed Logins or Brute Force.
- Use Inactive (30+d, 90+d, 365+d) and Pwd Age to find old accounts and old passwords.
- Click a column heading to sort, for example Last Login.
- Review risky apps. Click Look risky and open each app
See every application connected to your Microsoft 365 tenant, what it is allowed to do, who approved it and whose data it has reached.
From the article: How to find risky applications
- Click the Look risky box, or open the page from the risky-apps figure on the Microsoft 365 dashboard.
- Check the Risk column: High-risk perms (red), Elevated perms (amber), OK or Trusted. Hover over the badge to see why.
- Rows highlighted in red are suspicious or match a known rogue app.
- Tenant baseline reviewed. Watch Configuration Changes from now on
See every change detected in your Microsoft 365 configuration, who made it and exactly what changed.
From the article: How to find a change
- Choose an Object Type, or leave All types.
- Set Severity (min). The default is medium, which hides info and low changes.
- Choose a Change Type (added, modified or deleted) if needed.
- To see one person's changes, type their address in User UPN, for example jane@example.com.
- Choose how far back to look in Last (days): 1 day, 7 days, 30 days, 90 days or 1 year.
- Click the search button.
When you are done
The tenant is monitored, the first incidents are triaged, and you have a baseline to compare future configuration changes with.
Articles for the pages in this guide
- Connect Microsoft 365: Connect or re-authorize your Microsoft 365 tenant so Lavawall can monitor it, without seeing any monitoring data yourself.
- Microsoft 365 Applications: See every application connected to your Microsoft 365 tenant, what it is allowed to do, who approved it and whose data it has reached.
- Configuration Changes: See every change detected in your Microsoft 365 configuration, who made it and exactly what changed.
- Microsoft 365: See the security of your Microsoft 365 tenant at a glance: incidents, users, MFA coverage, connected apps, storage and configuration score.
- Identity & Account Management: See every user account from Active Directory, Microsoft 365, Google Workspace and local computer accounts in one list, with the risks that matter.
- Microsoft 365 Breach Console: Triage suspected Microsoft 365 account compromises, with a plain-language explanation of what happened and what to do next.
Still need help?
Search the support centre, or contact our support team and tell us which step you are on:
- Chat now: use the chat button in the bottom-right corner of this page to reach our team right away. Where cookie consent is needed, the chat starts after you accept (cookie settings).
- Email: send our support team a message through the contact page. It goes straight to a person.
- Phone: AB: 1-403-538-5053, BC: 1-778-731-1339, ON: 1-289-724-8829, US: 1-406-988-7333, UK: +44 20 3695 9786.