Turn your website into a lead source
Turn your website into a lead source with a blog, a branded domain scanner, chat, and visitor logging.
A Lavawall® task guide: 6 steps across 5 console pages.
Before you start
- Who can do this: Anyone who can see the page
- Plan: Included with every Lavawall® account. Domain Scanner Pro (prospecting & white-label; add-on) or Web Visitor Logging + Chat (included in Complete). Web Visitor Logging + Chat (included in Complete). See pricing.
- Where to start: open Blog Editor in your console.
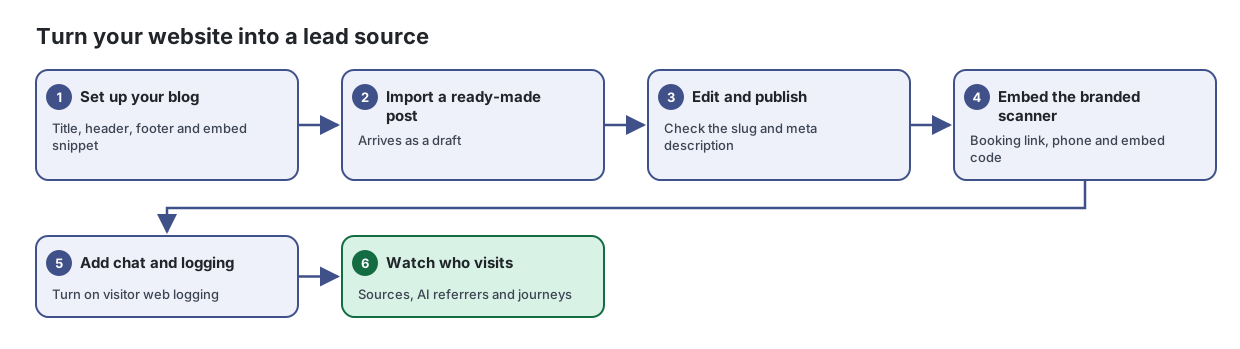
Steps
- Set up your blog. Title, header, footer and embed snippet
Set up your company blog so it matches your website, then add it to your site with a short snippet.
From the article: How to set up your blog
- Under General Settings, enter the Blog Title and Subtitle, and the URL Slug for the blog's address on your domain.
- Set Posts Per Page and Homepage Posts.
- Add your Logo URL, Favicon URL and a Default OG Image URL for social sharing.
- Adjust the SEO Title Template, for example "{title} | {blog_title} | Example Co.".
- Select Save Configuration, then Preview Blog to see it in a new tab.
- Import a ready-made post. Arrives as a draft
Start your blog quickly with ready-made articles you can import, adapt and publish as your own.
From the article: How to import an article
- Select a category to narrow the list, or leave All selected.
- Read the card's title and excerpt.
- Select Import to My Blog and confirm.
- The article opens in the Blog Editor as a draft. Edit it, then select Publish when it is ready.
- Edit and publish. Check the slug and meta description
Write and publish blog posts for your own website, with the search-engine details filled in as you go.
From the article: How to write and publish a post
- Type the post's title in Post title.... The URL Slug fills in from the title.
- Write the post in the body editor.
- Under SEO & Meta, check the URL Slug, write a Meta Description for search results, and add a Featured Image URL if you have one.
- Check Author, and choose whether to Show in Blog, Show in Knowledge Base or both.
- Select Save to keep it as a draft, or Publish to make it live.
- Embed the branded scanner. Booking link, phone and embed code
Put a domain security scanner, a support chat and visitor logging on your own website, all branded to your company.
From the article: How to brand the scanner
- Under Scanner Customization, enter your Unformatted Phone number with country code (digits only) and the Formatted Phone Number your clients will see.
- Enter the Booking Link Text, such as "book a meeting with us", and the Booking Link URL. It must begin with https://.
- Enter the Embedded Page: the address of the page on your site where the scanner will appear. It must begin with https://.
- Select Update. Select Revert to discard unsaved changes.
- Add chat and logging. Turn on visitor web logging
From the article: How to add a chat widget and visitor logging to your site
- In Chat, set the Widget Title, Button Colour, Position (Bottom Right or Bottom Left) and Button Style (Circle, Pill or Square).
- Write a Greeting Message and an Offline Message.
- For each of Name, Email and Phone in Pre-Chat Form Fields, choose Hidden, Optional or Required.
- Enter an Offline notification email so visitors' messages reach you when no technician is available. Separate several addresses with commas.
- Turn on Show chat widget on website and, if you want it, Enable visitor web logging. Select Save Settings and check the Live Preview.
- Select Copy beside the embed code and paste it just before the closing body tag on your site.
- More steps in the article
- Watch who visits. Sources, AI referrers and journeys
See who visits your website, where they come from and what they read, without a separate analytics tool.
From the article: How to see this week's traffic
- Leave Date range on Last 7 days, or choose another range up to Last year.
- Read the summary tiles and Visitors Over Time.
- Turn on Hide company IPs to leave out visits from your own organization's devices.
When you are done
Your website publishes useful articles, scans visitors' domains under your brand and shows who visited.
Articles for the pages in this guide
- Blog Editor: Write and publish blog posts for your own website, with the search-engine details filled in as you go.
- Blog Setup: Set up your company blog so it matches your website, then add it to your site with a short snippet.
- Embed Branded Domain Scanner: Put a domain security scanner, a support chat and visitor logging on your own website, all branded to your company.
- Public Content Library: Start your blog quickly with ready-made articles you can import, adapt and publish as your own.
- Visitor Web Log: See who visits your website, where they come from and what they read, without a separate analytics tool.
Still need help?
Search the support centre, or contact our support team and tell us which step you are on:
- Chat now: use the chat button in the bottom-right corner of this page to reach our team right away. Where cookie consent is needed, the chat starts after you accept (cookie settings).
- Email: send our support team a message through the contact page. It goes straight to a person.
- Phone: AB: 1-403-538-5053, BC: 1-778-731-1339, ON: 1-289-724-8829, US: 1-406-988-7333, UK: +44 20 3695 9786.