Onboard a new client
Add a new client, get their computers reporting, record who holds administrator access, and set up their billing.
A Lavawall® task guide: 6 steps across 6 console pages.
Before you start
- Who can do this: Anyone who can see the page. The roles you can give the new organization's first user depend on your own role.
- Plan: Client Organization Management (included in every plan). Included with every Lavawall® account. RMM Agent (Windows / Mac / Linux; included in Grow, Professional, and Complete). See pricing.
- Where to start: open Add Client in your console.
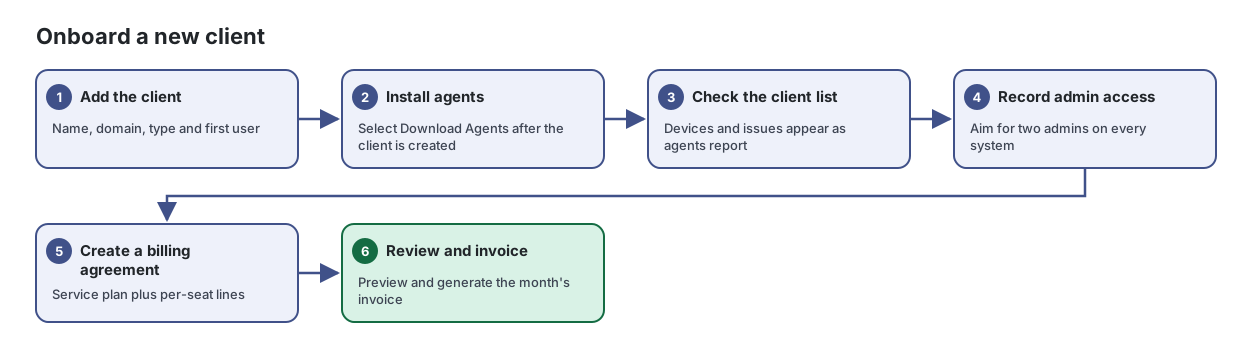
Steps
- Add the client. Name, domain, type and first user
Create a new client organization under your account, with its first user, in a single form.
From the article: How to add a client organization
- Enter the Organization Name. A Short Name of up to 12 characters is filled in for you; change it if you like. It is used in form titles and drop-down menus.
- Enter the Primary domain, such as example.com. If the client has no domain of its own, turn on No domain.
- Choose the Company Type: Client (with remediation/control capabilities), Read-only audit client, Managed IT Service Provider (may have clients), Auditor (read-only, compliance focused) or Stand-alone company (no client capabilities).
- Choose the Update Priority, from Beta tester to Lowest risk. Mainstream is the default.
- Select Create Organization. When you see "Company created.", select Download Agents to install the agent for this client.
- Install agents. Select Download Agents after the client is created
Download the Lavawall agent for Windows, Mac or Linux, or deploy it through Datto RMM, so your computers start reporting.
From the article: How to choose the company
- In the company selector at the top of the console, choose the company the computers belong to.
- Check that the company name appears next to each Download Link.
- Check the client list. Devices and issues appear as agents report
See every organization you manage in one table, with device health at a glance, and edit, merge or remove them.
From the article: How to drill into a client's issues
- Select a number in Devices, Platforms, Require Restart or AV Issue to open the matching device list for that client.
- Select a number in Need Update or Missing Update Devices to open the patch summary.
- Select a number in Config Issue Devices, Critical or High to open the configuration summary.
- If M365 shows Setup, select it to connect that client's Microsoft 365 tenant.
- Record admin access. Aim for two admins on every system
Know who holds administrator access to every system each client relies on, and spot systems with no administrator or only one.
From the article: How to add an administrator to a system
- Open a client.
- On the system's card, select Add admin.
- Choose or enter the person and save.
- To remove someone, select the remove (×) button beside their name.
- Create a billing agreement. Service plan plus per-seat lines
Set up how you bill each client once, so invoices build themselves from live device and licence counts.
From the article: How to create a client agreement
- Open 5. Agreements and select New agreement, or New from template to start from a saved template.
- Choose the client, name the agreement and set the status (Draft, Active, Paused or Ended), period (Monthly, Quarterly, Annual or One-time) and timing (Arrears or Advance).
- Pick the Default tax region, and optionally a PO number, Start, End, Auto-invoice and Notes.
- Under Service plan, choose an existing plan or set a plan type with its rates, Included hrs/mo and Min billable (min).
- Select Add line to add product, bundle, per-seat, prepaid or discount lines. Set Qty basis to Auto (live counts) or Manual.
- To invoice, select the invoice button on the agreement's row. It opens Billing Summary for that client.
- Review and invoice. Preview and generate the month's invoice
See what each client is using, from computers and security licences to support hours, so you can bill accurately and catch renewals in time.
From the article: How to review a month's usage
- Select All Companies in the company selector to see every client, or pick one client.
- Check Client Locations and Device Types for computer counts. Use the Active within 30 days column for billing active devices.
- Review Sophos, Huntress, Microsoft 365 Licenses and Google Workspace Licenses for licence counts.
- Review Service Plan Hours for clients close to or over their included hours.
When you are done
The client is in Lavawall with computers reporting, administrators recorded, and the first invoice ready.
Articles for the pages in this guide
- Add Client: Create a new client organization under your account, with its first user, in a single form.
- Billing Summary: See what each client is using, from computers and security licences to support hours, so you can bill accurately and catch renewals in time.
- Client Billing: Set up how you bill each client once, so invoices build themselves from live device and licence counts.
- Company Systems & Admin Access: Know who holds administrator access to every system each client relies on, and spot systems with no administrator or only one.
- Download Agents / Add Computers: Download the Lavawall agent for Windows, Mac or Linux, or deploy it through Datto RMM, so your computers start reporting.
- List Clients: See every organization you manage in one table, with device health at a glance, and edit, merge or remove them.
Still need help?
Search the support centre, or contact our support team and tell us which step you are on:
- Chat now: use the chat button in the bottom-right corner of this page to reach our team right away. Where cookie consent is needed, the chat starts after you accept (cookie settings).
- Email: send our support team a message through the contact page. It goes straight to a person.
- Phone: AB: 1-403-538-5053, BC: 1-778-731-1339, ON: 1-289-724-8829, US: 1-406-988-7333, UK: +44 20 3695 9786.